In the last couple of months, they released improvements to profiles, My Disqus and digest emails to make it easier to discover new discussions across Disqus.This widget now running on nine more different platforms and blogger is the second most popular platform after wordpress used my millions of blogger users on the web. By this tutorial you could learn how manually install disqus comment box widget on blogger blog.
Install Disqus On Blogger Blog in Traditional Way
1. First of all go to Disqus and click on Add Disqus to Your Site4. Now choose Blogger as your operating platform
5. Now your Disqus Comments Dashboard will come
6. Simply hit Add [Disqus Profile Name] to my Blogger site from step 1

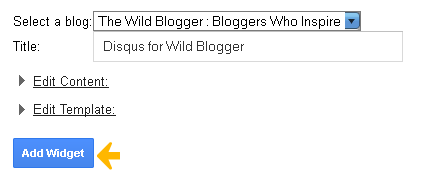
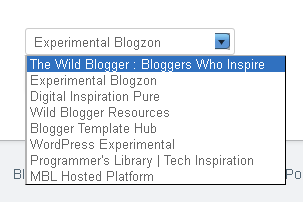
7. Now select your blog from a list of your account, Give a title of the widget, finally hit Add Widget

8. Now you will be redirected to your account Dashboard → Layout
9.You should see Disqus comment widget box on top of your sidebar
10.Now view a post and you should see Disqus comment in active instead Blogger comment box
How To Make Disqus Comment Mobile Compatible?
Disqus comment is fully compatible with Desktop, Laptop, iPad, iPhone, Android and other Mobile Devices. To make it mobile compatible in Blogger we just need to add a simple code. It's so easy and you can do it within less than 2 minutes1. Go to Template section on your account Dashboard
2. Click on Edit HTML
3. Now use Jump to widget module to easily navigate to Disqus comment widget
4. Once you find the widget simply add the following snippet within the widget line
mobile='yes'i.e. Your Disqus widget should look like this
<b:widget id='HTML2' locked='false' title='Disqus for Wild Blogger' type='HTML'>So it will be converted into
<b:widget id='HTML2' locked='false' mobile='yes' title='Disqus for Wild Blogger' type='HTML'>

5. Finally save your template and you're almost done!
Verify Installation:
Once you successfully installed Disqus comment into blogger you need to manually verify the widget in order that Disqus will report you with actual statistics- To verify your Disqus comment Go to Your Disqus Account Dashboard
- Scroll down your page a little and you should see Verify button
- Click on the verify button and your should see Disqus Comment is properly verified
Disqus Comment Not Working Properly!
Once you have added disqus on your template but the comment form still not working so you need to manually install Disqus comment on your template.Note: To add disqus comment box manually you need to remove previous comment box of Disqus from your Layout section
1. Go to Dashboard → Layout
2. Click on Add a Gadget
3. Now choose HTML/JavaScript from the list of blogger official Gadgets

4. Write“Disqus” as your widget title and write the following code within textarea
<!-- Disqus comments gadget -->

5. Now save the widget on top of your sidebar
6. Again Go to Template section
7. Click on Edit HTML
8. Now use Jump to widget module to easily navigate to Disqus comment widget
9. Or search for following code [Use CTRL + F]
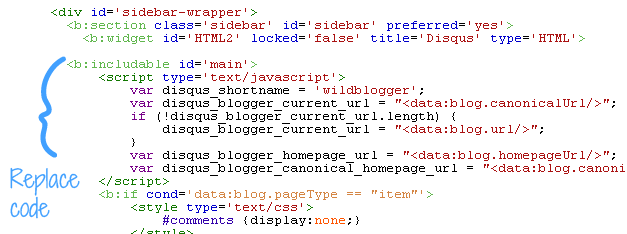
locked='false' title='Disqus' type='HTML'>10. Found it? Now simply change this line with below code
mobile='yes' locked='false' title='Disqus' type='HTML'>11. Now below this line our should see following <b:includable tag
<b:includable id='main'>
<!-- only display title if it's non-empty -->
<b:if cond='data:title != ""'>
<h2 class='title'><data:title/></h2>
</b:if>
<div class='widget-content'>
<data:content/>
</div>
<b:include name='quickedit'/>
</b:includable>
<script type='text/javascript'>
var disqus_shortname = 'EXAMPLE';
var disqus_blogger_current_url = "<data:blog.canonicalUrl/>";
if (!disqus_blogger_current_url.length) {
disqus_blogger_current_url = "<data:blog.url/>";
}
var disqus_blogger_homepage_url = "<data:blog.homepageUrl/>";
var disqus_blogger_canonical_homepage_url = "<data:blog.canonicalHomepageUrl/>";
</script>
<b:if cond='data:blog.pageType == "item"'>
<style type='text/css'>
#comments {display:none;}
</style>
<script type='text/javascript'>
(function() {
var bloggerjs = document.createElement('script');
bloggerjs.type = 'text/javascript';
bloggerjs.async = true;
bloggerjs.src = 'http://'+disqus_shortname+'.disqus.com/blogger_item.js';
(document.getElementsByTagName('head')[0] || document.getElementsByTagName('body')[0]).appendChild(bloggerjs);
})();
</script>
</b:if>
<style type='text/css'>
.post-comment-link { visibility: hidden; }
</style>
<script type='text/javascript'>
(function() {
var bloggerjs = document.createElement('script');
bloggerjs.type = 'text/javascript';
bloggerjs.async = true;
bloggerjs.src = 'http://'+disqus_shortname+'.disqus.com/blogger_index.js';
(document.getElementsByTagName('head')[0] || document.getElementsByTagName('body')[0]).appendChild(bloggerjs);
})();
</script>
</b:includable>

13. Now replace EXAMPLE with your site's shortname
14. Finally save your template and i think you should see no error in Disqus comment functions on your template
How To Make Disqus Internet Explore Compatible?
Disqus officially supports Internet Explorer versions 8-10. If Disqus is loading inconsistently or not at all for you in these browsers, there are several factors that may cause this:
Many older Blogger templates include a meta tag that forces all versions
of Internet Explorer to behave like Internet Explorer 7. Because Disqus
supports Internet Explorer 8 and higher, this will break functionality
and users won't be able to comment even with the latest version of
Internet Explorer. Below are instructions on how to fix this.
1. Go to Template section again
2. Click on Edit HTML
3. Now search for the following meta tag
<meta content='IE=EmulateIE7' http-equiv='X-UA-Compatible '/>4. Simply replace it with below one
<meta http-equiv="X-UA-Compatible" content="IE=9; IE=8; IE=7; IE=EDGE; chrome=1" />5. Finally save your template and you're done!
Note: If you use new blogger template (official template) or custom template then these changes are not needed to perform because IE readers will be able to view Disqus Comments
How To Import Blogger Comments Into Disqus?
Disqus makes it easy to import your existing blogger comments into your Disqus Account with just a simple comments importable tool. To simply import your blogger existing comments into Disqus following the instructions below1. Go to your Disqus Comment Dashboard
2. Click the link says “Import your existing Blogger comments into Disqus”

3. Click on Import Comments from Blogger next to One-time Import

4. Now click on Grant Access
5. Now choose your exact blog and hit Import

6. Finally you should see a notification says
Your import has been successfully uploaded and queued. We'll email you when your import has completed.7. You could learn more by clicking on Details
8. You could check your imported comments simply clicking on Comments tab of your account dashboar
What You Learned?
Disqus comment is most popular Commenting Widget to website owners and bloggers containing over 1.5 billion discussions everyday. Disqus comment box is more secured and allows users to post comment through various social networks (facebook, twitter, google+, linkedin). Also this comment box confirms your to remove spamming activities and gives the moderator full control over each comment.
People love this comment box very much because its posting method is quite smart that any other comment box also it allows multi features to monetize your comment but it takes a little bit extra load time than blogger , wordpress default comment box
If you find tutorial helpful don't forget to share it through your preferred social media via our social smart buttons.


If you want your order to get exclusive attention from our team, you can choose to add some of our special offers to your order and be sure that you’ll get the best grade in class. pay to write my paper imp source help us a lot for any kind of writing help.
ReplyDeleteVery Informative Post. Thanks for sharing.
Delete--->>How to Replace Blogger Comment Box with DISQUS
Thanks for tips and information
ReplyDelete