Hello bar is an active medium to get some extra impressions, conversions, social share, views, traffic, CTR reasonably from visitors. It's a fun, unobtrusive yet highly visible web toolbar that hangs on the top of your website and is a
great way to engage users and get them to take some extra actions on your particular content. There are lots of guides to properly using hello bar although hello bar team bringing more changes on their user interfaces but the process will lead you to setting a complete bar no matter what interface changes applied.
Today's guide is made on current interface changes of
hello bar so i think it will not be a trouble for any user to apply the
method.

Basically we offered this tutorial for blogger users but we updated it for WP users with appropriate guidelines attaching comprehensive images. Let's see how perfectly we can go through hello bar.

Basically we offered this tutorial for blogger users but we updated it for WP users with appropriate guidelines attaching comprehensive images. Let's see how perfectly we can go through hello bar.
How Bloggers Can Use Hello Bar?
Hello bar is a quickly traffic and clicks generator which allows a registered user to get upto 25 clicks per month running with free plan from a site. There is no limit of the amount of visitors to view the bar (until or unless they click on the link of bar). If you think you're getting huge clicks from hello bar which may exceed the limit for free user then you have a chance to upgrade the version to Pro account which allows upto 100 clicks starting at $4.95/month.
When hello bar first released it was a fixed bar with no expandable/collapseable feature but recently hello bar team released a premium coded sticky option for users which is completely free to use. Here is what the team member JAMIE HAMEL-SMITH says about new sticky option of hello bar
We’ve got a new Hello Bar feature to tell you about that we’ve affectionately named the sticky option. When we launched Hello Bar we only had 2 options for positioning the bar: “Pushes the page down” & “Covers page content”. Later we expanded this to include the “Stays at the top of the page” option or fixed positioning.You can even create multiple hello bars for your sites and switch them out so that to your promotions always fresh and update. Here you can use hello bar to make things appear in such cases and let your readers to do following
- Subscribe them to your RSS/Atom feeds
- Sign up for your email list or newsletter
- Focusing people to give attention to your most popular content
- Create a ready to get started page for your site and promote it
- Offer readers to download free/paid eBooks, digital goods, WP themes and more.
- Register for a live event that will take place on a certain date
- Let them hire you as a content marketer, SEO expert, Freelancer, consultant or something you claim
- Share special discounts on a product, promo codes or coupons
- Promote your social media bites for your blog's content
- Run lottery for any premium product as a giveaway
- Tell readers something special about your journey
- Offer readers to submit guest posts or become pro-contributor of your blog or site
- Drive some extra traffic to your older posts that are not getting views these days
- Promote other people profiles, sites or products
- Follow you on social media
- Share news with your readers
- And lots other promotions you can make with this dynamic sticky hello bar.
How To Create Your Own Hello Bar?
To create and install a hello bar is very easy. It generally should take not more than 5 minutes to create and give hello bar a test drive. I'd show you to create update sticky options of hello bar and how to install it on both WordPress and Blogger.
- Go to HelloBar product page
- Click on Free Signup button
- Now provide your email and click Start Using Hello Bar
- Now write your promotional page url(which link you want to promote through this bar) under where should your button link to and click continue
Bar Configuration
- On your bar configuration page write your promotional texts under Bar Text
- Write your button text under Link Text
- Also choose either the link will open with new window or same window under options of Open link in new window?
- Finally click next
Color Settings
- On color settings carefully pick colors for Background, Font, Button, Border, and link for you hello bar.
- You may choose the default style if you wish to run a test at first
Style Settings
- Choose your font size Regular 30px height, 14px font
- Pick your preferred font-family and keep default as sans-serif
- Keep link style default (display as button for better promotion)
- Also keep default to show border
Position Settings
- Choose default for the option of Remain at top of page?
- Also choose the default option for Push page down?
- Finally hit Next
- Now give a password for your account
- Also type your website URL and hit Create my account
Hello Bar Installation for Blogger
- Choose I can install code myself
- Now click on Click to Copy and the script would be copied, you can even save the script on a notepad
- Finally go to Blogger > Template
- Click on Edit HTML
- Now search for </head> tag
- Simply add the copied code right before your closing </body> tag
- Now save your template and you're done
- Finally hit on I've installed Hellobar and you'll be redirected to your dashboard
- Now you could see the daily stats with average clicks of your Hellobar
Hello Bar Installation for WordPress
1. Choose I use WordPress2. Download hellobar_wp_plugin.zip file and save your hard drive
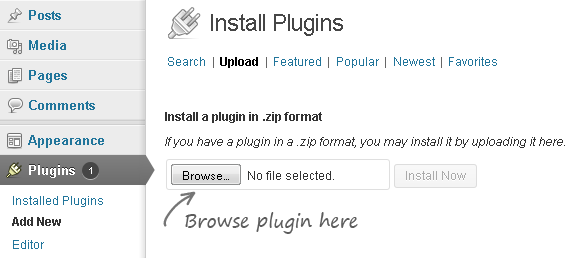
3. Now your WordPress Admin Panel and click on Plugins > Add New > Upload

4. Now browse your hello bar plugin and hit upload
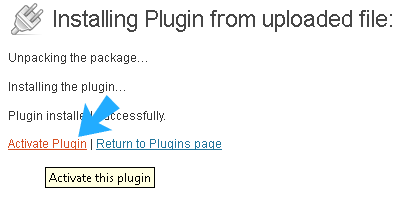
5. Now click on Activate Plugin

6. Once it's activated now go to hellobar tab and click on I've installed plugin and Done!

7. Now you could see the daily stats with average clicks of your Hellobar
What To Do Next?
I think finally you have learnt how to install hello bar on your desired platform and how you will get benefits using hello bar. Actually hellobar is an active medium to promote any product very quickly adopting any other method, because this widget surely can attract more than 50% of your entire blog or site attention from visitors. Once your site has reasonable traffic then you could easily understand the activity of hellobar from your dashboard stats.
Also using this bar your can help your 100 days(or more than that) older posts getting traffic, because due keyword gradients in search engines some of your posts may be dead or not getting any views. So they might be affected by Google algorithm. So it's a good way to increase your traffic.
Also using this bar your can help your 100 days(or more than that) older posts getting traffic, because due keyword gradients in search engines some of your posts may be dead or not getting any views. So they might be affected by Google algorithm. So it's a good way to increase your traffic.


This was really helpful!! Thank you!!
ReplyDelete