Related Tutorials:
- Read: Mashable Style Blogger Navbar
- Read: Advanced Css3 Menubar Widget for Blogger
- Read: Fully Css3 Powered Menubar Widget for Blogger
The Drop Down Functions
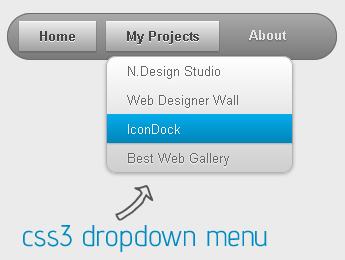
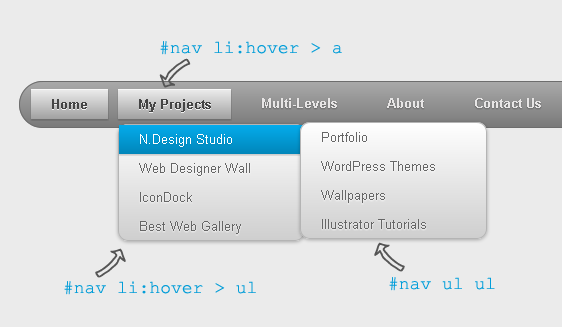
I'm not going to explain the entire functions of this css3 powered dropdown menu bar only a few points you'd learn with below image.
How To Add The Menubar on Blogger?
The installation procedure is very easy you just need to embed only css and html code on static location of your template and parse as xml code. Read the following instruction and get your navbar for blogger1. Go to Blogger → Template Section
2. Backup Your Entire Template(In case you want to bring back your previous design)
3. Now search for </b:skin
4. Found it? Now add the following css3 snippet right before the tag
#nav {Make the following changes to optimize the menubar
margin: 0;
padding: 7px 6px 0;
line-height: 100%;
border-radius: 2em;
-webkit-border-radius: 2em;
-moz-border-radius: 2em;
-webkit-box-shadow: 0 1px 3px rgba(0, 0, 0, .4);
-moz-box-shadow: 0 1px 3px rgba(0, 0, 0, .4);
background: #8b8b8b; /* for non-css3 browsers */
filter: progid:DXImageTransform.Microsoft.gradient(startColorstr='#a9a9a9', endColorstr='#7a7a7a'); /* for IE */
background: -webkit-gradient(linear, left top, left bottom, from(#a9a9a9), to(#7a7a7a)); /* for webkit browsers */
background: -moz-linear-gradient(top, #a9a9a9, #7a7a7a); /* for firefox 3.6+ */
border: solid 1px #6d6d6d;
}
#nav li {
margin: 0 5px;
padding: 0 0 8px;
float: left;
position: relative;
list-style: none;
}
/* main level link */
#nav a {
font-weight: bold;
font-family: Helvetica, Arial;
color: #e7e5e5;
text-decoration: none;
display: block;
padding: 8px 20px;
margin: 0;
-webkit-border-radius: 1.6em;
-moz-border-radius: 1.6em;
text-shadow: 0 1px 1px rgba(0, 0, 0, .3);
}
/* main level link hover */
#nav .current a, #nav li:hover > a {
background: #d1d1d1; /* for non-css3 browsers */
filter: progid:DXImageTransform.Microsoft.gradient(startColorstr='#ebebeb', endColorstr='#a1a1a1'); /* for IE */
background: -webkit-gradient(linear, left top, left bottom, from(#ebebeb), to(#a1a1a1)); /* for webkit browsers */
background: -moz-linear-gradient(top, #ebebeb, #a1a1a1); /* for firefox 3.6+ */
color: #444;
border-top: solid 1px #f8f8f8;
-webkit-box-shadow: 0 1px 1px rgba(0, 0, 0, .2);
-moz-box-shadow: 0 1px 1px rgba(0, 0, 0, .2);
box-shadow: 0 1px 1px rgba(0, 0, 0, .2);
text-shadow: 0 1px 0 rgba(255, 255, 255, .8);
}
/* sub levels link hover */
#nav ul li:hover a, #nav li:hover li a {
background: none;
border: none;
color: #666;
-webkit-box-shadow: none;
-moz-box-shadow: none;
}
#nav ul a:hover {
background: #0399d4 !important; /* for non-css3 browsers */
filter: progid:DXImageTransform.Microsoft.gradient(startColorstr='#04acec', endColorstr='#0186ba'); /* for IE */
background: -webkit-gradient(linear, left top, left bottom, from(#04acec), to(#0186ba)) !important; /* for webkit browsers */
background: -moz-linear-gradient(top, #04acec, #0186ba) !important; /* for firefox 3.6+ */
border-radius: .4em;
color: #fff !important;
-webkit-border-radius: .4em;
-moz-border-radius: .4em;
text-shadow: 0 1px 1px rgba(0, 0, 0, .1);
}
/* level 2 list */
#nav ul {
background: #ddd; /* for non-css3 browsers */
filter: progid:DXImageTransform.Microsoft.gradient(startColorstr='#ffffff', endColorstr='#cfcfcf'); /* for IE */
background: -webkit-gradient(linear, left top, left bottom, from(#fff), to(#cfcfcf)); /* for webkit browsers */
background: -moz-linear-gradient(top, #fff, #cfcfcf); /* for firefox 3.6+ */
display: none;
margin: 0;
padding: 0;
width: 185px;
position: absolute;
top: 35px;
left: 0;
border: solid 1px #b4b4b4;
-webkit-border-radius: 10px;
-moz-border-radius: 10px;
border-radius: 10px;
-webkit-box-shadow: 0 1px 3px rgba(0, 0, 0, .3);
-moz-box-shadow: 0 1px 3px rgba(0, 0, 0, .3);
box-shadow: 0 1px 3px rgba(0, 0, 0, .3);
}
/* dropdown */
#nav li:hover > ul {
display: block;
}
#nav ul li {
float: none;
margin: 0;
padding: 0;
}
#nav ul a {
font-weight: normal;
text-shadow: 0 1px 1px rgba(255, 255, 255, .9);
}
/* level 3+ list */
#nav ul ul {
left: 181px;
top: -3px;
}
/* rounded corners for first and last child */
#nav ul li:first-child > a {
-webkit-border-top-left-radius: 9px;
-moz-border-radius-topleft: 9px;
-webkit-border-top-right-radius: 9px;
-moz-border-radius-topright: 9px;
}
#nav ul li:last-child > a {
-webkit-border-bottom-left-radius: 9px;
-moz-border-radius-bottomleft: 9px;
-webkit-border-bottom-right-radius: 9px;
-moz-border-radius-bottomright: 9px;
}
/* clearfix */
#nav:after {
content: ".";
display: block;
clear: both;
visibility: hidden;
line-height: 0;
height: 0;
}
#nav {
display: inline-block;
}
- To change the border radius of navbar simply change → border-radius: 2em;
- Change the background color of navbar replacing color code → background: #8b8b8b;
- Change the border property of navbar simple change border: solid 1px #6d6d6d
- Change the font-family and colors of nav links → font-family: Helvetica, Arial; color: #e7e5e5;
- Change the current navbar and nav hover backgroun color → background: #d1d1d1;
- Change dropdown list background color #0399d4
- Change the dropdown list border properties border: solid 1px #b4b4b4;
6. Right after this tag add the following html code to generate multi level dropdowns
<ul id="nav">Make Following Changes
<li class="current"><a href="http://www.wbtsource.host22.com">Home</a></li>
<li><a href="#">My Projects</a>
<ul>
<li><a href="#">N.Design Studio</a>
<ul>
<li><a href="#">Portfolio</a></li>
<li><a href="#">WordPress Themes</a></li>
<li><a href="#">Wallpapers</a></li>
<li><a href="#">Illustrator Tutorials</a></li>
</ul>
</li>
<li><a href="#">Web Designer Wall</a>
<ul>
<li><a href="#">Design Job Wall</a></li>
</ul>
</li>
<li><a href="#">IconDock</a></li>
<li><a href="#">Best Web Gallery</a></li>
</ul>
</li>
<li><a href="#">Multi-Levels</a>
<ul>
<li><a href="#">Team</a>
<ul>
<li><a href="#">Sub-Level Item-1</a></li>
<li><a href="#">Sub-Level Item-2</a>
<ul>
<li><a href="#">Sub-Level Item-2.1</a></li>
<li><a href="#">Sub-Level Item-2.2</a></li>
<li><a href="#">Sub-Level Item-2.3</a></li>
</ul>
</li>
<li><a href="#">Sub-Level Item-3</a></li>
</ul>
</li>
<li><a href="#">Sales</a></li>
<li><a href="#">Another Link</a></li>
<li><a href="#">Department</a>
<ul>
<li><a href="#">Sub-Level Item</a></li>
<li><a href="#">Sub-Level Item</a></li>
<li><a href="#">Sub-Level Item</a></li>
</ul>
</li>
</ul>
</li>
<li><a href="#">About</a></li>
<li><a href="#">Contact Us</a></li>
</ul>
Since this is a multi level dropdown menu with fully css3 functioned and optimized. You have to know some basics to change the links of this big snippet of dropdowns.
Look i've colored interconnected links for your ease to find the ul li tags appropriately.
Each dropdown starts with <ul> tag and ends with </ul> tag
This <ul>...</ul> tags remain in <li>....</li> tags
For example:
<li><a href="#">N.Design Studio</a>Under N.Design Studio you will get 4 dropdowns Portfolio,WordPress Themes,Wallpapers, and Illustrator Tutorials
<ul>
<li><a href="#">Portfolio</a></li>
<li><a href="#">WordPress Themes</a></li>
<li><a href="#">Wallpapers</a></li>
<li><a href="#">Illustrator Tutorials</a></li>
</ul>
</li>
According this system other dropdowns are interconnected and i've marked each dropdown with similar matched colors so you could easily find them out.
For your better experience please see this live demo and do match links for your practice.
7. Finally save your template and you're all done!
Need More Support?
This is an advanced css3 supported menubar widget works on any html based regular websites, cms platforms (Joomla, WordPress) and Blogger blogs. The menubar is compatible with IE 8+, Firefox and other webkits. It's developed with gradient but the color codes work properly even with the lower version of your current browser.
If you find tutorial helpful don't forget to share it with your preferred social buttons, if you need more support please leave your feedback it's greatly appreciated. Be safe and happier...!
If you find tutorial helpful don't forget to share it with your preferred social buttons, if you need more support please leave your feedback it's greatly appreciated. Be safe and happier...!


0 comments