Google's Blogger is the funniest platform to do much more things we don't even expect. This is the only versatile blog publishing software you can use the way you want, more flexible, easy to maintain, monetize content, widgets, design and schedule the right time to publish. Developing a widget for blogger is easy but it's too hard to create awesomeness when you feel different. You might be familiar with drop down lists, easily we can create for navigation menu bar supported CSS and regular HTML code, but creating drop down category or label in blogger is bit different although there are still much resources for fixing this issue.
I have come across a beautiful way to create and design drop down label list in blogger that is almost WP style and responsive for different devices (tablet, mobile, ipad etc.). I have used a code written by bloggersentral.com and applied some styling on it. You may see the live demo on sidebar there but now you also can apply it on your own blog.

This dropdown widget is much more efficient to engage readers with more categories, also easy to navigate any category no need to search manually. Helpful for your readers to navigate content and helpful for your site to get bounce rate reduction.
Let's see how you can install this beauty widget on your blogger blog.
1. Go to Blogger.com and login your account2. Now choose your target blog and go to "Layout" section
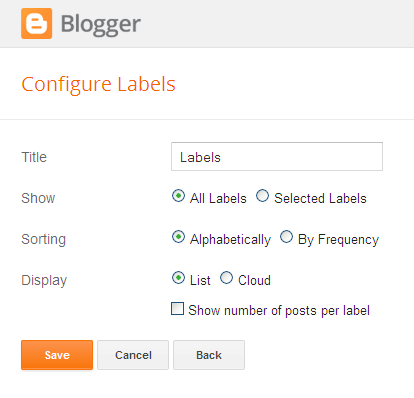
3. From sidebar hit "Add a Gadget" and choose "Labels"

4. Keep the configuration setting of label almost same, no change needed and save it under or above your desired widget

5. Now save "Pageelement" and go to "Template" section
6. Restore your template in case you made any mistake for safe side of getting instant backup
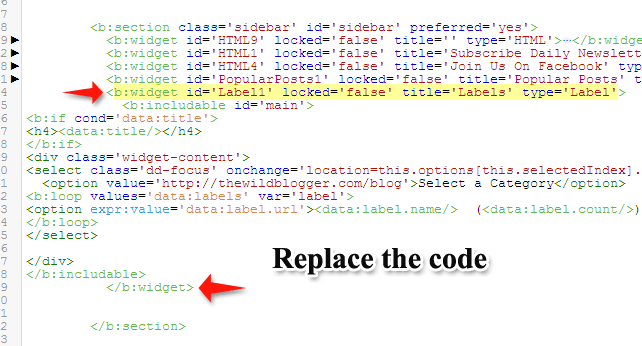
7. Click on HTML and search for below line
b:widget id='Label1' locked='false' title='Labels' type='Label'

Hint: You will get this line after ='sidebar or ='sidebar-wrapper
9. Found it?
10. Now carefully see this <b:widget ends with terminating tag </b:widget> like this
<b:widget id='Label1' locked='false' title='Labels' type='Label'>...</b:widget>Hint: If the code line is not closed then hit the line number straight to <b:widget and it will be wrap up with terminating tag </b:widget> and you will see a right angle arrow after the line number you hitted.
11. Now copy following code and replace with above code for default blogger label widget
<b:widget id='Label1' locked='false' title='Labels' type='Label'>
<b:includable id='main'>
<b:if cond='data:title'>
<h2><data:title/></h2>
</b:if>
<div class='widget-content'>
<select class='dd-focus' onchange='location=this.options[this.selectedIndex].value;'>
<option value='http://thewildblogger.com/blog'>Select a Category</option>
<b:loop values='data:labels' var='label'>
<option expr:value='data:label.url'><data:label.name/> (<data:label.count/>) </option>
</b:loop>
</select>
</div>
</b:includable>
</b:widget>

Make sure following changes before saving template:
- To add a different title instead of blogger's typical "Lebels" then replace this text Labels
- Change these tags h2 /h2 if your headline tags different i.e. h3, or h4
- Add your blog URL replacing http://thewildblogger.com/blog
- If you don't want to show label count for individual label then simply remove this code (<data:label.count/>)
- If you want to display a different text to select a label from dropdown then add your text replacing Select a Category
13. Now copy following CSS code and add before </b:skin tag
input.dd-focus:focus, select.dd-focus:focus, textarea.dd-focus:focus, button.dd-focus:focus {Make sure following changes:
box-shadow: 0px 0px 3px 2px #FE890C;
outline: 0px none;
}
.dd-focus {
width: 100%;
}
textarea.dd-focus, select.dd-focus {
background: none repeat scroll 0% 0% #FFF;
border: 1px solid #DDD;
margin: 0px 0px 12px;
padding: 8px;
}
button.dd-focus, input.dd-focus, select.dd-focus, textarea.dd-focus {
margin: 0px;
font-size: 14px;
font-family: open sans;
vertical-align: middle;
}
- To change box focus color replace this hex color code #FE890C
- To add a different font family for dropdown lists simply change open sans
- Also change font size to 14px
- You can even change border color of the flat list as #DDD
Don't forget to see live demo of this beautiful widget by visiting your blog's frontpage. If you get this tutorial helpful don't forget to share with blogsphere. You're almost welcome to visit my blog anytime


0 comments